Toolbars
Display toolbar
The ‘Display’ toolbar (The ‘Display’ toolbar.) allows to change the way the data is displayed in a very fast way.
- The first three buttons allow to rotate a 3D data stack from XY to XZ to YZ.
- The fourth button allows to exchange the displayed X and Y axis and thereby to tilt the data axes.
- The fifth button changes the data representation from overlaid to side by side.
- The sixth button is to show the different data channels in RGB colors. The first channel will be shown in red, the second in green, and the third in blue. All other channels will not be changed.
- The seventh button shows/hides the information and comment pane on top of the measurement view.
- The eighth button shows information on the data stack dimensions.
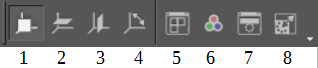
The ‘Display’ toolbar.
Files toolbar
- The first button of the ‘File’ toolbar (The ‘Files’ toolbar.) creates a new measurement with default imaging parameters (which are given during the installation of the microscope).
- The second button of the file toolbar creates a new measurement from a template (containing the imaging parameters).
- The third button of the file toolbar opens a measurement from a file. Here as well files from other compatible imaging formats can be opened.
- The fourth button of the file toolbar saves a measurement with a given file name (save as).
- The fifth button of the file toolbar saves a measurement under the same file name the current measurement is entitled with.
- If the ‘overwrite warning’ is activated Imspector will ask if the current measurement should be overwritten. Otherwise it saves it with the same file name. An already existing file may be overwritten!
- The sixth button of the file toolbar creates a new window within the current measurement.
- The seventh button of the file toolbar cuts out the selected data window. The data is purged to the clipboard.
- The eighth button of the file toolbar copies the selected data to the clipboard.
- The ninth button of the file toolbar pastes the selected data window to the measurement or graph window.

The ‘Files’ toolbar.
Measurement toolbar
- The first button of the ‘Measurement’ toolbar (The ‘Measurement’ toolbar.) is the ‘REC’ button. It starts a measurement with the given parameters.
- The second button of the ‘Measurement’ toolbar pauses a measurement at the point when it is pressed.
- The third button of the ‘Measurement’ toolbar clones a measurement including the imaging parameters.
- The fourth button of the ‘Measurement’ toolbar is labeled ‘Auto repetition’. When pressed, the measurement is continued until being stopped.
Note
If the ‘overwrite warning’ is activated Imspector will ask if the current measurement should be overwritten. An already existing file may be overwritten!
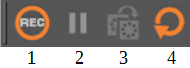
The ‘Measurement’ toolbar.
Zoom toolbar
- The first three buttons of the ‘Zoom’ toolbar (The ‘Zoom’ toolbar.) are similar to the ones known from Windows applications: zoom to selection, zoom in, zoom out.
- The fourth button of the ‘Zoom’ toolbar (‘Reset Zoom’) zooms the data to a scale where one pixel on the screen equals one pixel in the measurement.
- The fifth button of the ‘Zoom’ toolbar enlarges the measurement window to the size of the shown data (containing the zoom factor).
- The sixth button of the ‘Zoom’ toolbar shrinks the measurement window to the size of the shown data (containing the zoom factor).
- The seventh button of the ‘Zoom’ toolbar locks the dimensions of shown data.

The ‘Zoom’ toolbar.